Running SQL Server on Azure Virtual Machines
Introduction
We recently started hitting some capacity issues with an SQL Server Reporting Services box hosted
on Microsoft's Azure Cloud Platform. The server had been setup around the time, Microsoft end-of-life'd
their platform-as-a-service report server offering, and forced everyone back onto standalone instances.
The server was a Basic A2 class VM (3.5GB Ram, 2 Cores). Originally, it only had to handle a small amount of report
creation load but in recent times, that load has gone up significantly. And due to the "peaky"
nature of the customer's usage, we would regularly see periods where the box could not keep up with
report generation requests.
In the past week, we've moved the customer to a new SQL Server 2014 Standard Edition install. Here are a few of the things we've
learned along the way with regards setting up SQL Server as a standalone instance on an Azure VM.
This information is based on the service offerings and availabilities in the Azure North Europe region as of February 2016
Which Virtual Machine Class?
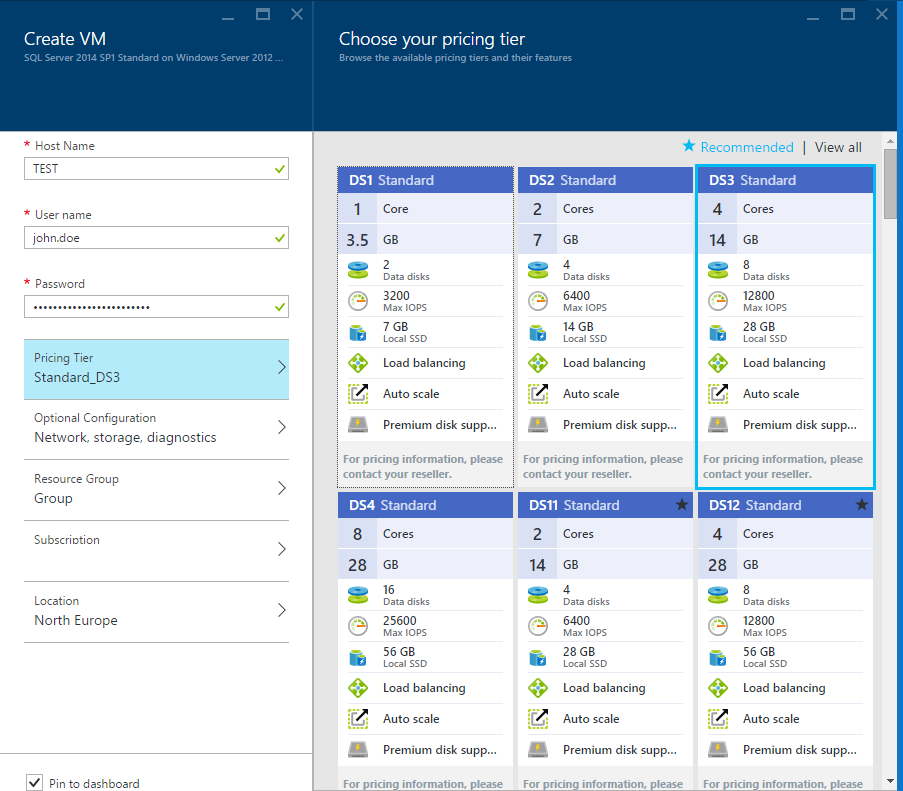
First off, you should choose a DS scale virtual machine. At the time of writing, Microsoft offer 4 different VM classes
in the North Europe region: A, D, DS and D_V2. Only the DS class machines currently support Premium Locally
Redundant Storage (Premium LRS) which allows you to attach permanent SSD storage to your server.
Within the DS Set, DS1-DS4 have a slightly lower memory : core count ratio. The DS11-DS14 set have a higher
starting memory foot print for the same core count. We went with a DS3 server (4 core / 14GB) which we can downscale to
DS1 during out of hours periods.
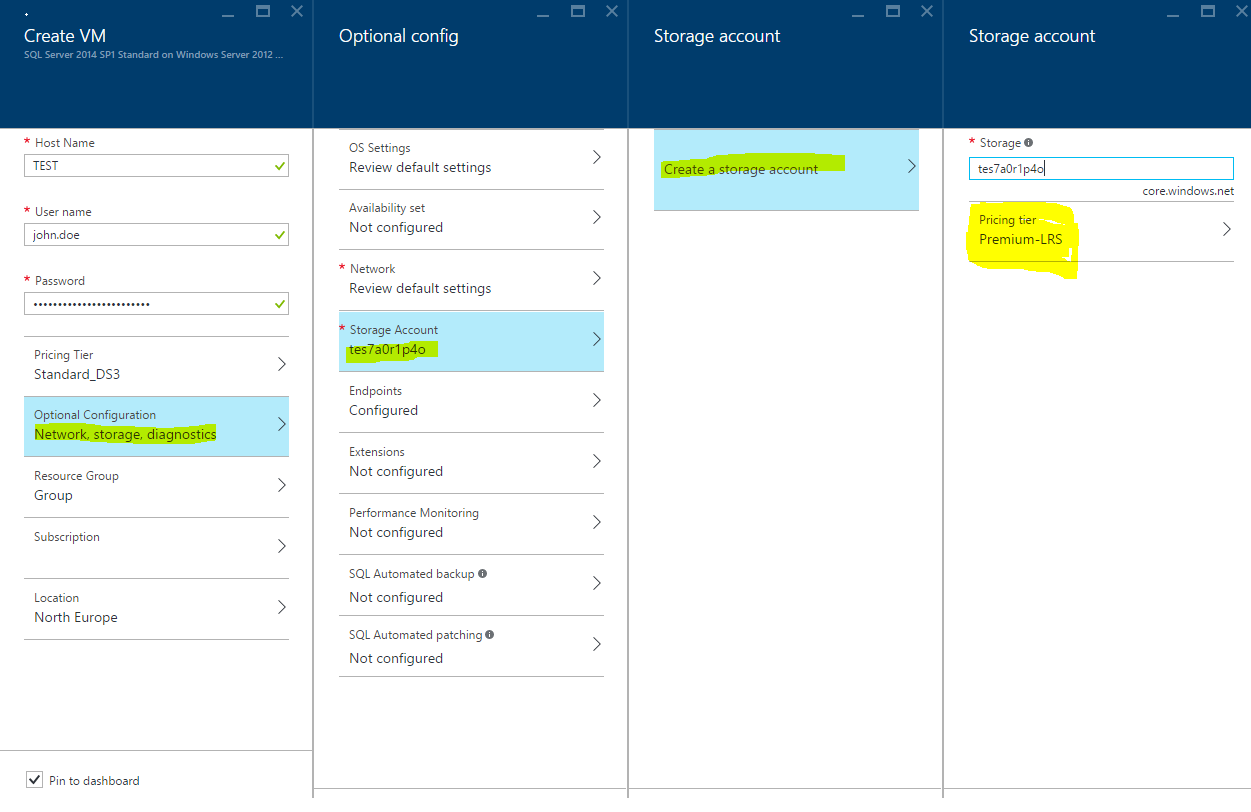
Which Storage Account?
During setup ensure that you’ve selected a Premium Locally Redundant Storage account which will
provide you access to additional attachable SSDs for your SQL Server. This can be found under
Optional Configuration > Storage > Create Storage Account > Pricing Tier
External Security
Security will be somewhat dependent on your specific situation. In our case, this was a
standalone SQL Server with no failover cluster or domain management. The server was setup
with a long username and password (not the john.doe account in the screenshots).
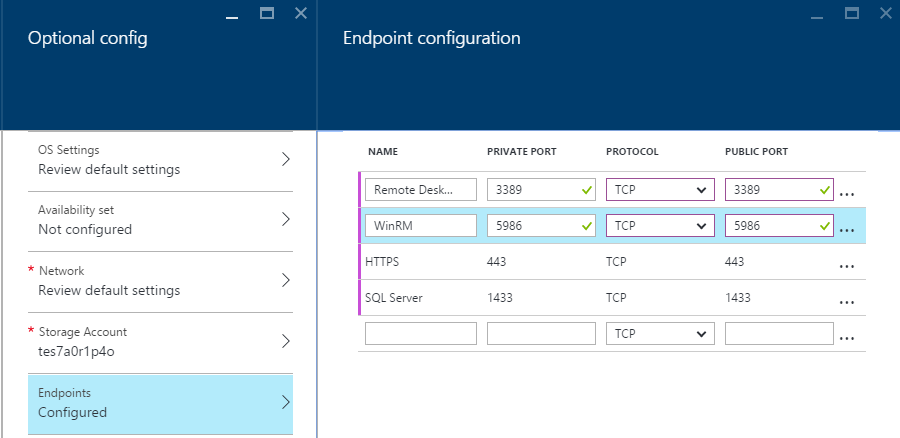
We also lock down the management ports for Remote Desktop and Windows RM, as well as the added
HTTPS and SQL ports. To do this, add the public-to-private port mapping configurations under
Optional Configurations > Endpoints
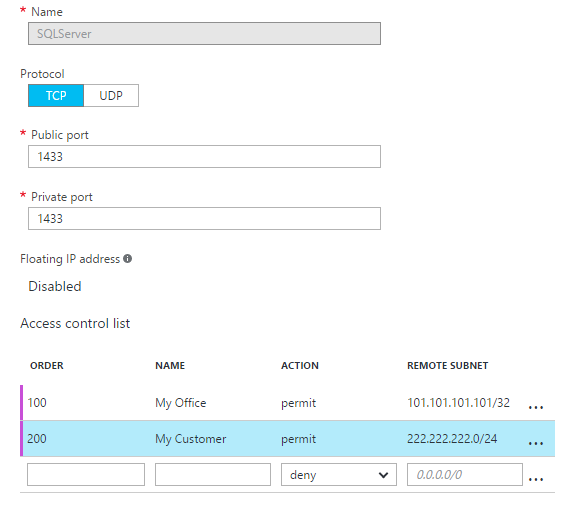
Once you’ve finished setting up the configuration and azure has provisioned the server,
you’ll want to reenter the management blades and add ACL rules to lock down port access
to only the IP Ranges you want to access it. In our case, our development site, customer
site, and Azure hosted services.
You can add “permit” rules for specific IP addresses to access your server.
Once a single
permit rule is added, all other IP Addresses/Ranges are blocked by Default.
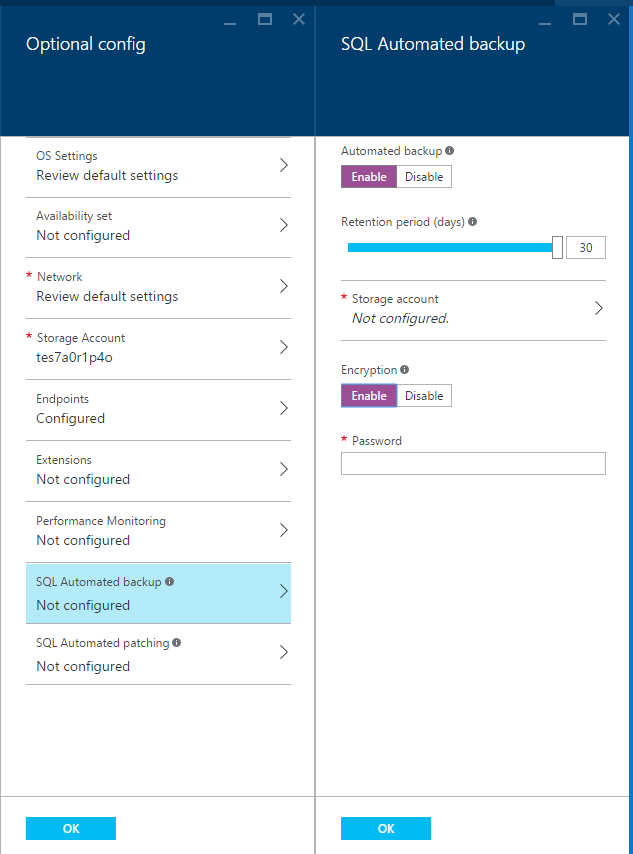
Automated Backups
SQL Azure VMs can now leverage an automated off-server database backup service
which will place your backups directly into Blob Storage. Select SQL Automated
Backup and enable it. You will be asked to specify where you would like to store your
backups and for how long. We chose to use a non-premium storage account
for this, and depending on the inherent value of your backups and whether you
intend to subsequently off-site them yourself, you might want to choose a storage
setup with zone or geo redundancy. You can also enable backup encryption by providing
a password here.
Disk Configuration
Now that your server is up and running, you can log in via Remote Desktop. The first
thing you’ll want to do is patch your server. As of mid-February 2016, the base image
for SQL Server 2014 on Windows Server 2012 Standard R2 is missing quite a number of
patches. Approximately ~70 critical updates and another ~80 optional updates need to
be installed.
Once you’ve got your server patched, you can take a look at the disk setup. If you’ve
chosen a DS Class Server, you’ll notice that you have 2 Disks. A regular OS disk, and
an SSD Temp Disk. This temp disk is NOT to be used for real data, it is local only to
the VM while it’s running and will be deallocated and purged if you shut the server
down
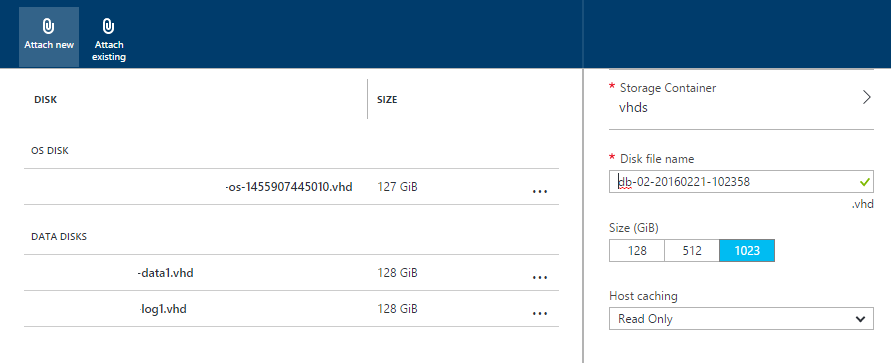
You can however purchase additional SSD disks very easily. Head back out to the Azure
Management Portal, find your VM, go to settings and choose Disks. In the following
screenshot, we've chosen to add an additional 2 x 128GB disks (P10 class) disks to
the server. The
SQL Server best practices document recommends using the 1TB (P30 class) disks
which do give a significant I/O bump but they are also more expensive.
Ensure that you specify “Read Only” host caching for your Data Disk and No-Caching for
your Log disk to improve performance.
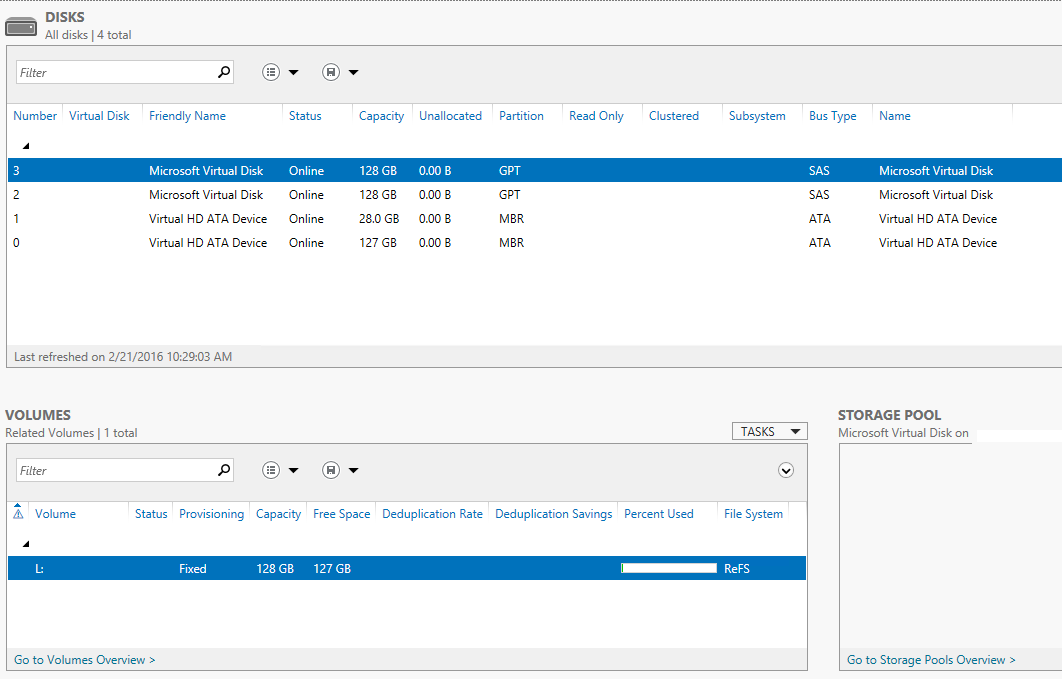
Once your disks are attached you can access and map them inside your VM. We chose to
setup the disks using the newer Window Server 2012 Resilient File System (ReFS) rather
than NTFS. Previously there were potential issues with using ReFS in conjunction with
SQL Server, particularly in relation to sparse files and the use of DBCC CHECKDB however
these issues have been resolved in SQL Server 2014.
Moving your Data Files
SQL Server VM Images come pre-installed with SQL Server so we’ll need to do a little bit
of reconfiguration to make sure all our data and log files end up in the correct place. In the
following sections, disk letters & paths refer to the following.
- C: (OS Disk)
- D:\SQLTEMP (Temp/Local SSD)
- M:\DATA\ (Attached Perm SSD intended for Data)
- L:\LOGS\ (Attached Perm SSD intended for Logs)
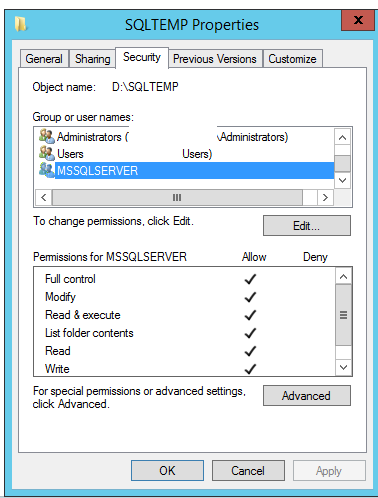
First, we need to give permission to SQL Server to access these other disks. Assuming
you haven’t changed the default service accounts, then your SQL Server instance will
be running as the NT SERVICE\MSSQLSERVER account. You’ll need to give this account Full
Permissions on each of the locations you intend to store data and log files.
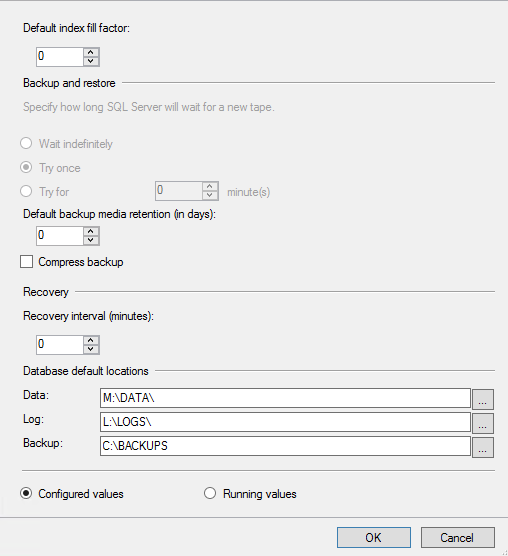
Once the permissions are correct, we can specify those directories as new defaults
for our Data, Logs and Backups.
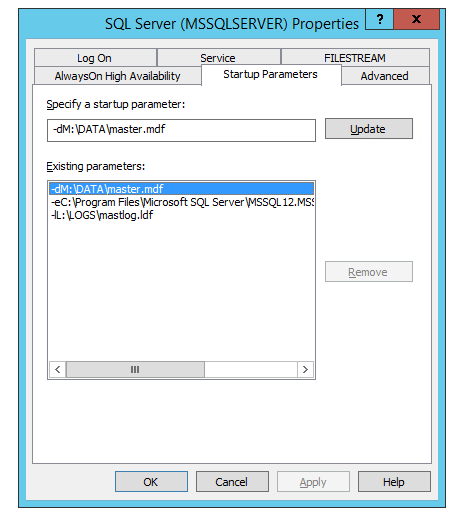
Next We’ll move our master MDF and LDF files, by performing the following steps.
- Launch the SQL Server configuration Manager
- Under SQL Server Services, select the main Server instance, and stop it
- Right click the server instance, go to properties and review the startup parameters tab
- Modify the –d and –e parameters to point to the paths where you intend to host your data and log files
- Open Explorer and navigate to the default directory where the MDF files and LDF files are located (C:\Program Files\Microsoft SQL Server\MSSQL12.MSSQLSERVER\MSSQL\). Move the Master MDF and LDF to your new paths
- Restart the Server
When our server comes back online, we can move the remainder of the default databases.
Running the following series of SQL Commands will update the system to expect the MDFs
and LDFs and the new location on next start up.
ALTER DATABASE [msdb] MODIFY FILE ( NAME = MSDBData , FILENAME = 'M:\DATA\MSDBData.mdf' )
ALTER DATABASE [msdb] MODIFY FILE ( NAME = MSDBLog , FILENAME = 'L:\LOGS\MSDBLog.ldf' )
ALTER DATABASE [model] MODIFY FILE ( NAME = modeldev , FILENAME = 'M:\DATA\model.mdf' )
ALTER DATABASE [model] MODIFY FILE ( NAME = modellog , FILENAME = 'L:\LOGS\modellog.ldf' )
ALTER DATABASE [tempdb] MODIFY FILE (NAME = tempdev, FILENAME = 'D:\SQLTEMP\tempdb.mdf');
ALTER DATABASE [tempdb] MODIFY FILE (NAME = templog, FILENAME = 'D:\SQLTEMP\templog.ldf');

--You can verify them with this command
SELECT name, physical_name AS CurrentLocation, state_desc FROM sys.master_files
Shut down the SQL Instance one more time. Phyiscally move your MDF and LDF files to
their new locations in Explorer, and finally restart the instance. If there are any
problems with the setup or the server fails to start, you can review the ERROR LOG in
C:\Program Files\Microsoft SQL Server\MSSQL12.MSSQLSERVER\MSSQL\Log\ERRORLOG
Conclusions
There are a number of other steps that you can then perform to tune your server.
You should also setup SSL/TLS for any exposed endpoints to the outside world
(e.g. if your going to run the server as an SSRS box). Hopefully you will have a you a far
more performant SQL Instance running in the Azure Cloud.
~Eoin Campbell